Did I mention that I'm starting a new Tau army? Well, yes. I am. Slow at first, but soon I will be triumphant and fearsome with my Tau legion of vengeance!
Incidentally, I keep ruining Fire Warriors in an attempt to get my paint scheme right. No word yet on how many will have to sacrifice their lives before the right shade of blue is achieved.
It's all in the interest of the Greater Good, so I'm sure they don't mind.
8/28/2005
8/25/2005
A Little 180 On My 180
I was going to go to a tournament this weekend. Now I'm not.
You might think it's because if the denial of Harlequins in my army but, please... put that thought to rest. It's a bit of a relief in a lot of ways because, believe me, modeling that thing wasn't going to be a pleasure.
The truth is that I don't want to paint without interruption for 48 hours while my life rots away around me. The truth is I don't want to get up at 6 AM so I can start playing by 9. The truth is that I'm going to see my grandparents on Sunday and I want to spend Saturday doing things like laundry and assembling a model of an Avro Arrow that I've been saving for my grand-dad. The truth is that I'd have to actually buy a Fire Prism to make the changes in my list that I want to make, and I don't feel like spending that cash... yet I don't want to play this list without one. The truth is that I need that time I mentioned a few days ago; a break, a time-off, a no-pressure period of take-it-or-leave-it 40k hobbying.
The truth is that I just don't wanna go. It's as simple as that.
I'll publish pics of that Arrow if I make it look nice, though.
Oh Creative Army List Notion: We Hardly Knew Ye
The Gatineau HOH tourney won't allow Harlequins. So that's the end of that.
I'm currently considering making up the points that the Shadowseer-sized hole leaves in my army list with another Vyper and another Warlock. The list now stands like this:
If anyone can give me an idea of what to do with about 200 points (replacing one Vyper and one Warlock), I'd like to hear it. Don't get me wrong; I want to play a really hardass list, but I want it to have some flavor. I don't want to just show up with yet another Biel Tan mallet with which to pound everything. I want to pound everything with style. Remember the basic theme of the list, though; mounted and fast-moving. I'd also rather not add another tank if I can avoid it, as sometimes Biel Tan becomes a little too much of a Grav Tank Rodeo; if I'm going to be mounted, I want the points spread nicely among a variety of vehicles.
Hit that comment button and give me some ideas, would ya?
BTW, yes... I will finish that Shadowseer... someday.
I'm currently considering making up the points that the Shadowseer-sized hole leaves in my army list with another Vyper and another Warlock. The list now stands like this:
* Farseer: Witchblade, Fortune, Runes of Witnessing, Ghosthelm, Guide, Mind War, Spirit Stones, JetbikeFour Jetbikes, three Vypers, two tanks. Yawn. How boring.
3 X Warlock Bodyguard: Witchblade, Destructor, Jetbike
* Farseer: Witchblade, Shuriken Pistol, Fortune
(The Farseer goes in the Falcon with the Banshees)
* 3X Vyper Squadron: Shuriken Cannon Upgrade, Star Cannon, Spirit Stone, Holo-Field
* 4 Howling Banshees
Exarch: Executioner
(The Banshees go in the Falcon with the Farseer)
* 8 Striking Scorpions: Plasma & Haywire Grenades
Exarch: Scorpion's Claw
Wave Serpent: Shuriken Cannon Upgrade, Linked Bright Lances, Spirit Stone
* Falcon Grav-Tank: Shuriken Cannon Upgrade, Star Cannon, Pulse Laser, Holo-Field, Spirit Stone
Models in Army: 24
Total Army Cost: 1498
If anyone can give me an idea of what to do with about 200 points (replacing one Vyper and one Warlock), I'd like to hear it. Don't get me wrong; I want to play a really hardass list, but I want it to have some flavor. I don't want to just show up with yet another Biel Tan mallet with which to pound everything. I want to pound everything with style. Remember the basic theme of the list, though; mounted and fast-moving. I'd also rather not add another tank if I can avoid it, as sometimes Biel Tan becomes a little too much of a Grav Tank Rodeo; if I'm going to be mounted, I want the points spread nicely among a variety of vehicles.
Hit that comment button and give me some ideas, would ya?
BTW, yes... I will finish that Shadowseer... someday.
8/24/2005
What Becomes A Harlequin Most?
 I've decided to go to a Warhammer 40,000 tournament this weekend in Gatineau. I have made up a new list which is going to be somewhat interesting for me because it's basically the standard Biel-Tan "Mechanized Fist" with one difference: I'll have a Harlequin Shadowseer on a Jetbike. I'm currently cutting, shaping, carving, smoothing and otherwise praying that my conversion will look nice. Want a guided tour of my progress so far? Click the picture.
"...They Pull Me Back In"
So that "hiatus" I was talking about sure isn't working out too well. Since posting about how I am going to take some time off, I've painted a couple Tau Gun Drones, made a special slot-style holder for my Falcons and signed up for another tournament.
Oh well. At least there will be lots of posts here for those of you who dig reading about Warhammer through my eyes.
Oh well. At least there will be lots of posts here for those of you who dig reading about Warhammer through my eyes.
8/21/2005
Break Time
Ok, I really need a break from Warhammer.
From writing this blog to painting like there's no tomorrow to playing game after game, I've reached a saturation point. Don't get me wrong; you're not going to see Deimhinn Sinn on Ebay any time soon, and I do believe I'll be back into it before long. What will decide when I get back into it? Basically I'm looking for a little piece of mind about the various areas of my life: Work, kids, money, love, art, health. I'm going to spend a little working on those things and, when I feel a sense of relaxation about them, I'm sure I'll be right back. It might be a few days. Might be a week. Might be a month. Who knows?
Anyhow, back in a bit.
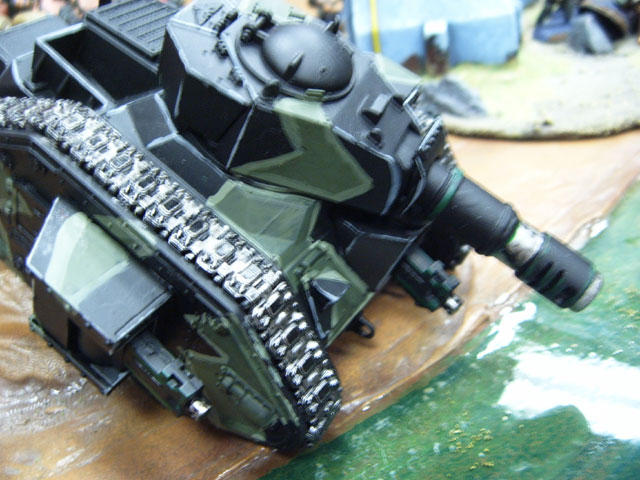
The New Wave Serpent
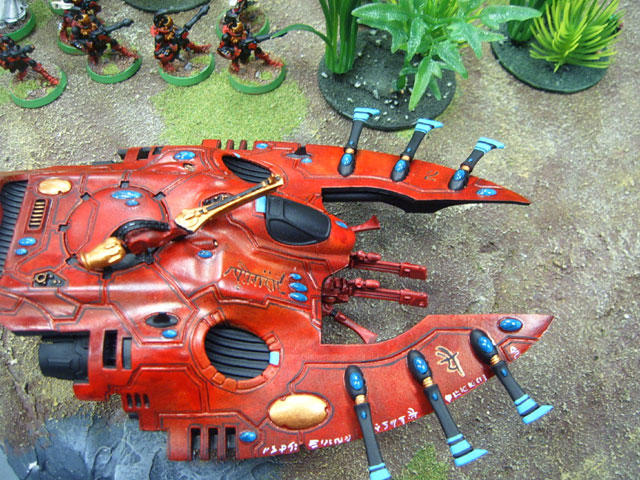
Sometimes I just wish I'd keep my big cake-hole shut. Those of you who have been reading this blog for a while might remember my big rant about the new Games Workshop Wave Serpent a few months back in which I stated, with great clarity, that I wasn't convinced I liked it. I'm a fan of the Forgeworld model (and own two of them already. Other Wave Serpent-related thoughts can be found at the above link, but I never thought I'd actually get the Games Workshop model.
Well, I did.
It turns out those spines on the wings are actually very sturdy (who knew?), but it does seem rather like GW took a Falcon, slapped a couple of Eldary doo-dads on it, and put it on the shelf. The thing is, neccessity is the mother of impulse buying, so I picked up the GW one and got to work on making it bee-yootiful (or an approximation thereof).
There are a few points of note that I will share, but first I'll offer a few photos of the (mostly) finished product: Here's one, another, and yet one more.
It was intended to carry a squad of Fire Dragons based on this paint scheme (which is why you see some ice blue in the Serpent's color scheme). Like most of the tanks I paint, I started on this one with no real idea of what I was going to do with it or how. This sometimes ends up yielding some really great "Eureka"-type results (like this, where I almost completely improvised), but this wasn't going so well. To keep it short, I based it in black (as I knew my red was running low), and then coated it in my "Deimhinn Sinn Red" mix.
I don't know why, but it looked like crap.
So then I tried to spice it up by spraying it with red primer but, as I suspected, I was out and only managed to spackle it. It looked way, way worse and I tried to cover it up with more DS red, thus screwing it up even more. At this point, I was starting to lose hope and then began to sort of drybrush/mottle it with Blazing Orange and Sunburst Yellow. Finally, in one last desperate attempt to make something nice of it, and washed it generously in red ink. Suddenly... it looked awesome. I released a "phew" of relief that I hadn't destroyed this beautiful tank and then went on to finish it.
I black-lined the panels (sloppily, mind you) and then looked for interesting things to write on it to make it look mysterious and unique. I looked up "sanskrit" on Google Image Search and found a copy of The Lord's Prayer in Sanskrit and copied a bit of it right next to the cockpit.
The question of the turret is always a tricky one for me because I never use the turret assemblies that come with the model. I was also lacking twin-linked Scatter Lasers (which I needed for the tournament) and ended up making a couple out of parts from the Wave Serpent, a couple extra bitz and a toothpick. It looked really nice, but the magnet made the profile a bit high, so I mounted it under the body. I'll take more photos once I get it properly painted up.
In the end, I did not fall in love with the GW Wave Serpent the way I did with the Forgeworld version, but... the colors turned out really nice and I do sort of like the spines along the edge.
I don't, however, see myself buying any more Wave Serpents for a very, very long time.
8/20/2005
Anyone Wanna Buy A Fire Dragon Army: Cheap?
The dwindling fingers of Deimhinn Sinn must stretch forth now to reach the remote and violent places of the universe. The heretic, the fallen, the barbarian and the devourer await our arrival with outstretched arms and gleaming knives expecting, in their ignorance, that the fewness of our numbers will spell certain doom for us.
What they cannot forsee is the burning knife of the Eldar falling upon them with fury. As the sun sets and the machines of Khaine are lowered to the humble ground, we will sink the blades into their hearts and burn their souls while they still lie within them. On this day the tide of Deimhinn Sinn rolls over the enemy as the learned among us have foreseen.
Their screams shall be remembered through all the ages of history. Alas, their names shall not.
What a load of crap that turned out to be.
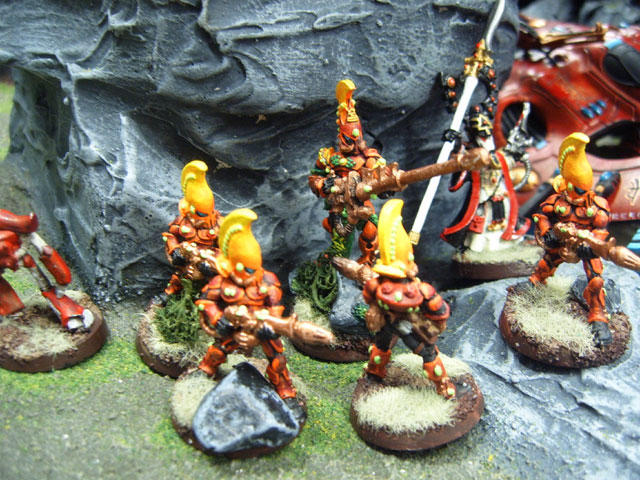
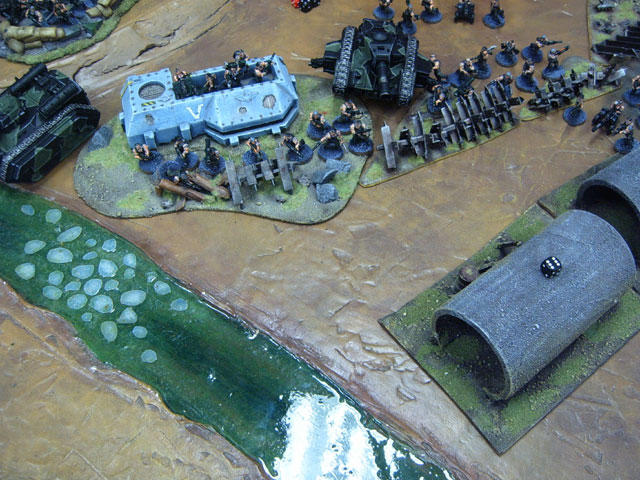
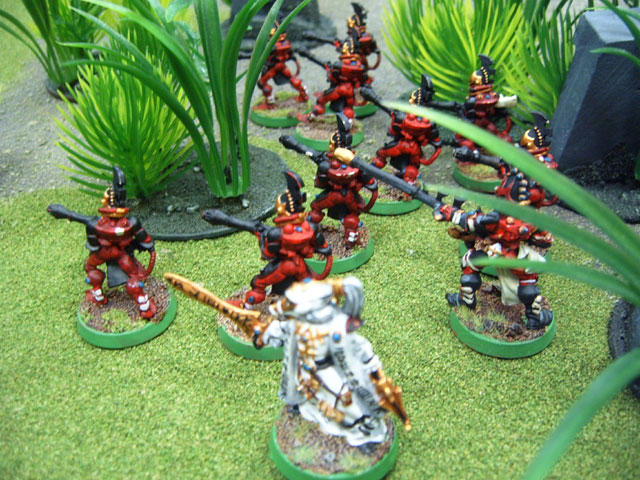
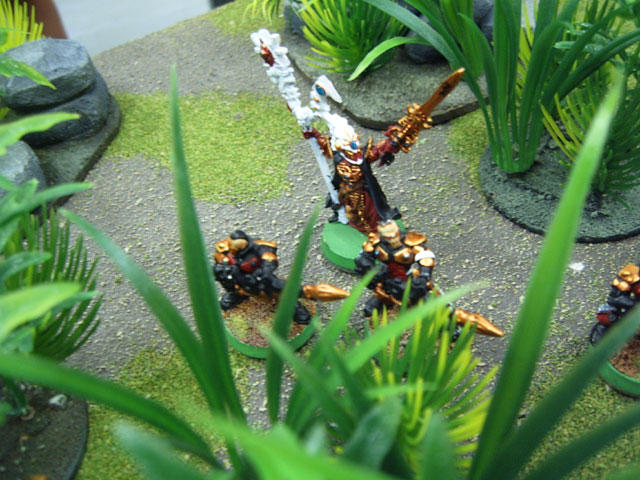
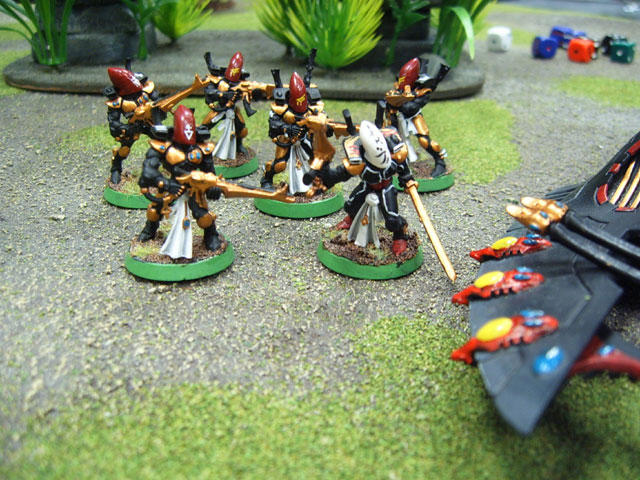
I went to the Hall of Heroes tournament at the St. Laurent Games Workshop store, and I had a lovely time... but I cannot boast the proud list of ferocious wins that I did the last time I went. I did take my list of all Fire Dragons (using the Biel Tan rules) and here's what I came up with:
Farseer with Witchblade, Pistol, Runes of Witnessing, Ghost Helm and Fortune.
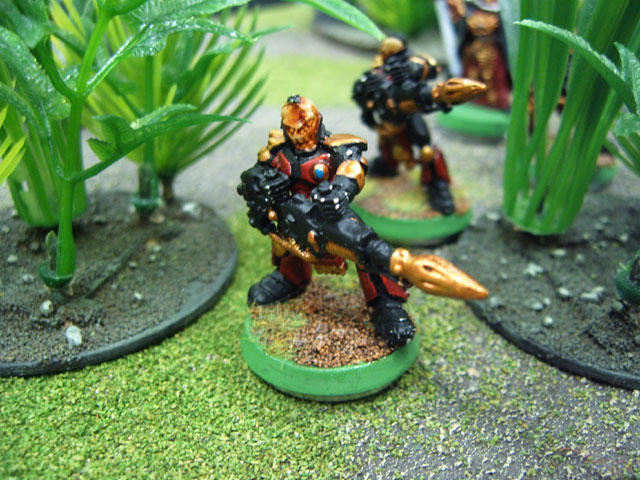
8 Fire Dragons & Exarch w/Burning Fist
Wave Serpent w/Twin Linked Scatter Lasers, Shuriken Cannon & Spirit Stone
8 Fire Dragons & Exarch w/Burning Fist
Wave Serpent w/Twin Linked Scatter Lasers, Shuriken Cannon & Spirit Stone
9 Fire Dragons & Exarch w/Burning Fist
If you look at the photos below, you'll notice I also debuted a new Wave Serpent. I may take a couple minutes to write that up in a separate post soon.
The Hall of Heroes requirements also demanded a short bit of "fluff" on the army in question, which I have listed at the top of this post. As usual, I had it bound in a transparent folder with an Eldar rune on the front. Very striking, if you ask me. Unfortunately, I didn't quite have the game record to back it up. Observe...
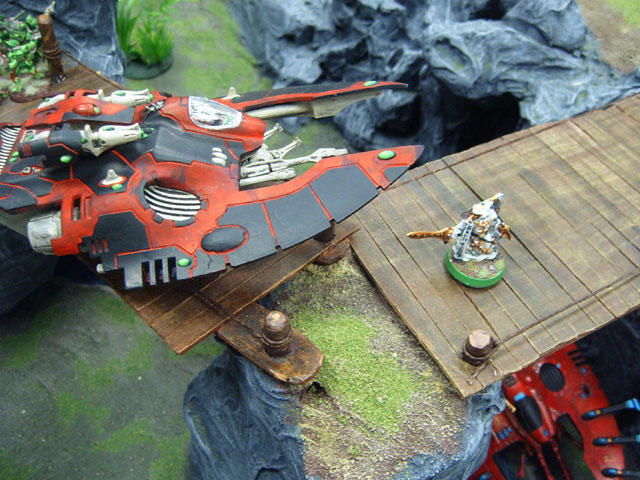
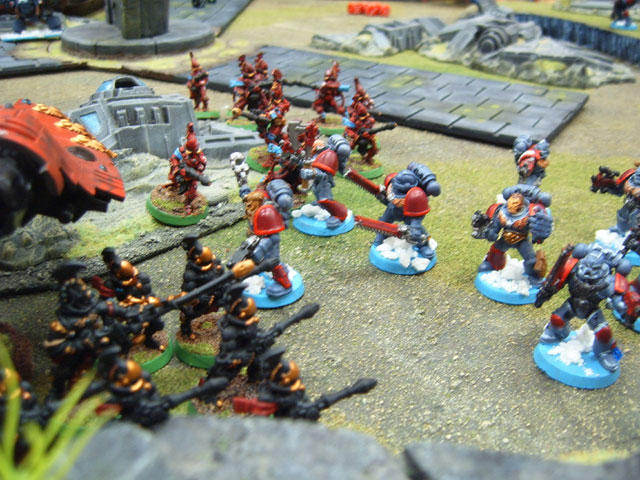
Adam Brown, the GW Red Shirt who was running the campaign decided it'd be funny if he began the day by pitting me against my old buddy, Benoit (aka Zphindar), who is a dyed-in-the-wool Eldar player like me. It was kind of fun to play against him (you might remember that I played against his Iyanden a few weeks ago). He was playing Biel Tan and, well... we shook hands and deployed on a really cool table (huge ravine and bridge over it). It was a game of Secure and Control and... first thing off the bat he corked one of my two Wave Serpents. Just like that. Popped out a gaggle of Fire Dragons and, well... I just never really bounced back.
First game: Slaughter Victory for Benoit.


Then came Jay and his army of Gaunt's Ghosts in a game of Seek and Destroy. I don't know a lot about Imperial Guard, mainly because there are a lot of rules, and sub-rules, and rules within rules, etc. One Guard army isn't like the other, and I've only played one other one anyhow. It started off with some bad dice rolls, a stumble or two, some bad luck, some inattention, a few bad moves and the next thing you know he's cleaning my army off the bottom of his shoe like it's a cowpie. He was very gracious, friendly, helpful and even let me slide on a couple of close-calls that could have gone either way. It didn't avail me a victory though. He beat me like a rented mule. What was funny was how he didn't bother looking at my little folder and reading the fluff therein until after he'd kicked my ass, and at that point things like "What they cannot forsee is the burning knife of the Eldar falling upon them with fury" didn't really create the kind of fear response I was hoping for.
Second game: Slaughter victory for Jay.

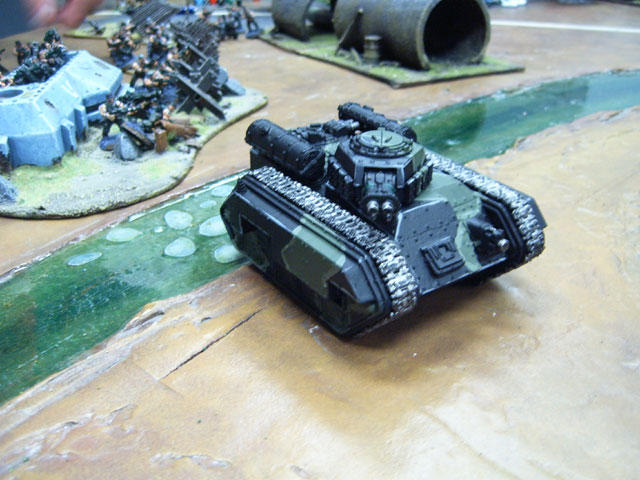


After lunch was another nice fellow. I can't remember his name, but he played Space Wolves. Now this... this is what Fire Dragons are all about. Simply put, he started with a unit of Long Fangs, a big unit of Blood Claws, a unit of whatever wolfy troop choice that army has, and two HQ. The Fire Dragons did what they do and hosed down tons of marines, one after the other. In the end, all he had on the table was an immobilized Dreadnought. It was a game of Cleanse, but... with nothing but a busted Dread on the table, you can't go claiming much.
Third game: Slaughter victory for me.


Finally came David. This was an interesting, if not somewhat existential game for me because David had actually borrowed my Eldar army to play at the tournament. When iw as matched up with him I, hence, ended up playing against my own models. Truth be told, it resulted in a somewhat boring match, as I play Eldar, had already played against Eldar on that day and then was playing against my own army. David was a good sport, though, and played thoughtfully and cleverly enough that I didn't tear him to shreds, but I did eke out a minor victory in this Recon game... and that brought the day to an end.


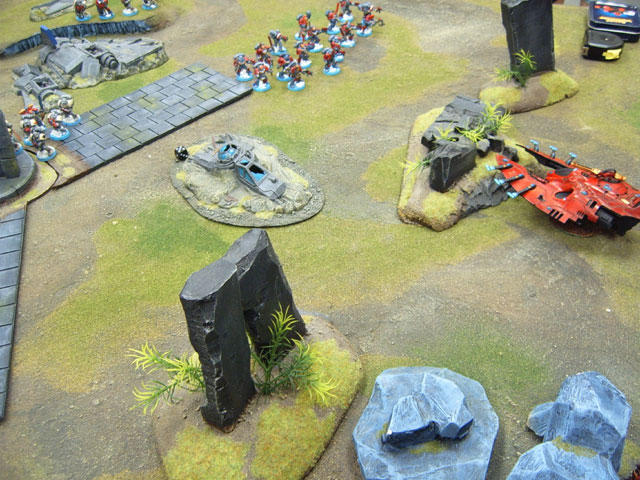
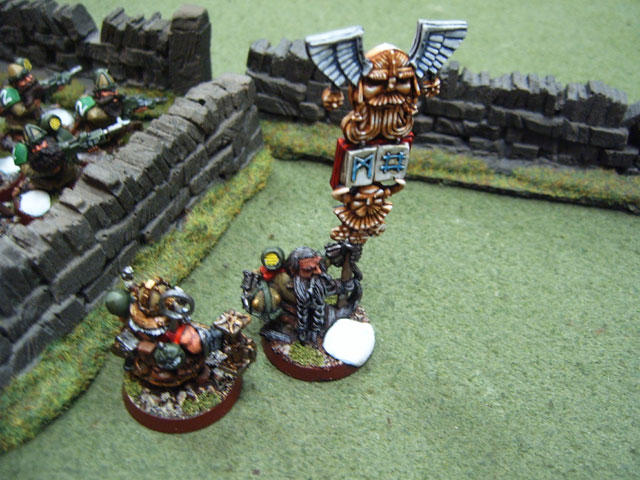
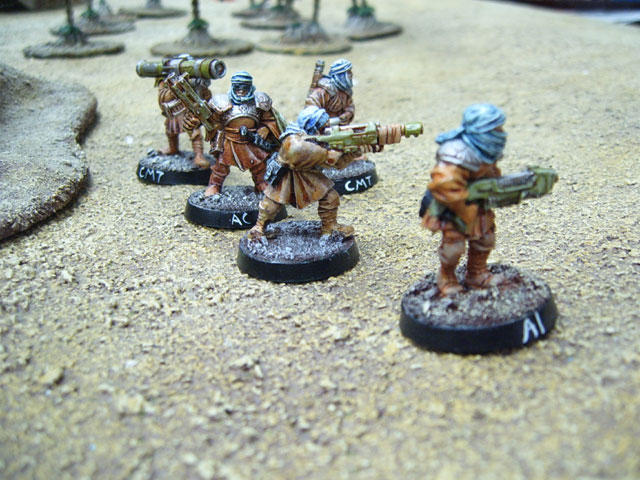
There were a lot of armies and opponents at the Hall of Heroes tournament that I would have liked to have played against, but there's always next time. Here's a very short collection of snaps from the action on other tables at this tournament.


8/16/2005
That Line In The Sand
I'm looking at my life right now and seeing that I have this awesome tournament to go to on Saturday, which will result in a crapload of 40k playing in one day. I also see that, between then and now, I have a crapload of painting to do. I am also working on somehow trying to score another Wave Serpent (so let's hope I can find a way to do that for free). Looking at my life for the last few weeks, I've been putting a huge amount of time and effort into Warhammer... painting and modeling and playing. Check out this blog and you can see it; sometimes even several entries in a single day.
I've decided that, after this tournament, I'm going to stop with Warhammer for a while. I'm not talking about a major, life-changing decision to turn my back on the hobby or anything; I'm just saying that I'll pack up my models and paints in some boxes and put them in the closet under the stairs for a while. When the urge to go back to it takes me over and if things are going decently enough in my day-to-day life, they'll come back out. Might be a few days. Might be a week. Might be a couple months. No idea. Not worried about it, either.
I have a lovely girlfriend who I want to devote a bit more time to. Speaking of people who deserve a bit more time devoted to them, my beautiful kids deserve that as well. In addition, I also have a full time job. When all of that is said and done, I think I might want to spend the little remaining "me" time on some things which haven't gotten the attention they deserve for a while.
Not quitting or anything like that. Just slowing down for a while after Saturday. Until Saturday, however, watch me kick a whole lot of 40k ass.
8/15/2005
Hall of Heroes
Time to get my head back in the game, here. There's a tournament coming up on the 20th, and I want to be there. Thing is, I don't just want to do the low-cost Biel-Tan thing (i.e. Banshees in one tank, Scorpions in another, Farseer otherwise mobilized). I want to do something different, even if it's at the expense of my victory.
I've decided to go with as many Fire Dragons as I can in one Biel Tan list. Nothing but Fire Dragons and whatever HQ I need to make it possible. At the moment that looks like: Three squads of 8 Fire Dragons plus an exarch in three Wave Serpents, plus one Farseer with Guide. That's it, baby.
God damn. I'd better get to work.
My Brother & The Tau
I told my brother on Instant Messenger that I was thinking about starting a Tau army (which I am). Now, he's a guy with a degree in art, so he knows a fair amount about what's what where painting is concerned. I spoke to him specifically because I wanted his view on what color to paint the Tau. You see, I don't like the sandy brown that most Tau are shown as, and I don't like camo or khaki (how, exactly, do Tau - a race which lives several zillion light years away from Earth - come up with a camo scheme which perfectly matches the same camo scheme used by the American military? The mind boggles). I told him I wanted clean colors, crisp and somehow indicative of the fact that the Tau are the "Good Guys" (so to speak). I didn't want red, as my Eldar have me all "redded out". I didn't want shiny metallics and I didn't want garish hues.
My brother is a man of few words. He was quiet for a few minutes. Then, without any comments, he linked me to this.
I looked once. I looked twice. I looked yet another time.
Good God, he's right.
Ladies and gentlemen, you have now seen the color scheme I plan to use for my Tau.
My brother is a man of few words. He was quiet for a few minutes. Then, without any comments, he linked me to this.
I looked once. I looked twice. I looked yet another time.
Good God, he's right.
Ladies and gentlemen, you have now seen the color scheme I plan to use for my Tau.
The Table™
The is The Table™. There are many tables like it, but this one is mine. If you keep reading you will see a comprehensive rundown of how it's made, tons of photos and so-on. It's not that I think this is a great table or that I'm a genius at table-making. I just want to share the highs and lows and, if I'm lucky, impart a bit of my experience making it for those who want to do one of their own.
In case this is the first you've read of it, I decided to make my first gaming table recently. I made this decision on a day when I was at the St. Laurent mall taking my kids to a movie and, with a few minutes to kill, popped into Games Workshop to see what was up. My kids, Ruth and Dora, fell in love with the gaming tables that had been made by the staff. I had a conversation with Ruth, who is eight, about possibly making our own table, and she said that she'd like to. Ruth is a very clear thinker and, if she says she wants to embark on a project, she's probably capable of doing that. We talked about what kind of table we wanted, how we wanted to make it, when, etc. I told her that we could do it the coming weekend and, now that said weekend has just past, we have enjoyed the process of creating a gaming table... together. Dora also helped, but her work is a bit more... "rough" than Ruth's. What with being five years old and something of a party girl, Dora doesn't really care too much about doing it the right way as long as she's invited to the event.
I, myself, was also quite chuffed about the idea of making this table but, to be honest, if it wasn't for Ruth desperately wanting to see it come to pass I probably wouldn't have; very few people come out to the sleepy town where I live to play Warhammer with me (in fact, almost none) and I don't really need yet one more big, bulky thing in my kitchen to figure out what to do with. The kids, however, adore this thing and can't get enough of playing with it. They have a small collection of their own models (mostly leftovers and really cheap old models that they can paint in whatever ghastly way they please), and they just go nuts on this thing. So... I believe I will probably get the occasional game in and the kids will definitely have a great time so... where's the harm?
The process of creating it was a lot of fun, though. Even though I am still trying to get sand out of my hair and from my socks, I consider it to be an unqualified success. Here's a rundown of the ingredients of the Table™ and how they were made...
The Cliff
 Ruth said she wanted a cliff, and so who am I to tell her that I can't make one? This is four layers of foam cut with an exacto blade and glued together with white glue. As it is with the Tiered Hill (below), I worked like a mofo to seal this thing with glue because I wanted to spray paint it (and, as we all know, spray paint eats through foam like a fat kid through an M&M). Lots of watered-down glue went on, and fine sand went on top of it. I acquired the sand from my buddy Keith, who called it "Military Sand" (whatever that means). Anyhow, it's very fine and did great for my purposes. I had the kids collect good rocks from outdoors and bring them in, and I littered them all over this and the Tiered Hill to give them a slightly rougher, more natural look. After sealing the sand and rocks in with more glue (I did a lot of gluing), I sprayed it with the reddish-brown Mars Primer I got from Canadian Tire and minimal damage was done (and, to be honest, I didn't give much of a damn at that point). Following that, a nice drybrush with Bleached Bone. The edges of the cliff are, of course, black with a drybrush of Codex Grey. I will follow it up later with a drybrush of Fortress Grey and them maybe even white. The rocks were washed in Brown Ink just to differentiate them from the rest of the ground and, later, I will drybrush those as well to give them detail and to dull their shine.
The Crashed Aquila Lander
 As many of you will know by the sight of it, this is the crashed Aquila Lander from the Games Workshop Macragge box set. There is a lot of truly awesome, high-detail terrain in that box (it's a great buy), and this is my favorite piece (or broken pieces).
It was done by painting the ship parts Codex Grey (thinned paint) and the dirty parts Bubonic Brown. The grey was inked with watered-down black ink, the brown parts with watered-down brown ink. A bit of the internal engine workings were painted in Boltgun Metal. The orange parts were done with Blazing Orange watered WAY down. Decals were applied and the whole thing was dry-brushed in bleached bone.
The only thing I wish I'd done (and will never do) is paint the details of the belt and Auspex which are lying next to the crash (you can't see those in the pic here, but you can see them in the other pic further down in this entry). It would have been one of those "little touches". I also could have glued a bit of flock into different area to make it look as if it was being overgrown, and I might still.
Fronds
 Keith gave me a mat which was like a little plastic net covered in sprigs of these coriander-like plastic plants. He told me they were used for a display, and they even had gigantic pink flowers mixed in (don't get your hopes up; I didn't use those on the table). Basically, I could pluck one sprig off at a time and use it as I wanted to. The grass mat (mentioned below) was the same; a net of plastic grass sprigs, all in discrete bunches. This was quite a coup, and made the creation of the scenery that much more interesting.
I didn't want to just cut out a piece of plastic card and then glue a bunch of plants on, creating a static blob of area terrain. Instead, I glued the fronds to small flight bases so that they could be moved and clumped however seemed fitting. This was kind of a pain in the ass, however; due to the way the individual clumps of plants were, I had to pluck them off, leaf by leaf, and shove them into the hole of the flight base (which was partially filled with green stuff to keep the stems in there). These stupid stems flopped this way and that, and I nearly lost my mind doing this.
Afterwards, I painted the bases Goblin Green and then proceded to add a layer of glue and sand. Finally, they were washed in Brown Ink. I *will* get around to dry-brushing them with Bleached Bone to bring out the individual grains of sand, but... I'm a little Bleached Boned out right now.
What I like is that when the bases are all shoved together, the plants look quite natural in that you can't really tell where one ends and the other begins. You can also arrange them however you wish to create the shape of the area terrain as you wish.
Grass
 The story about the grass is almost exactly like the story about the fronds, right down to the benefactor (Keith). The difference is that I mounted these on Warhammer Fantasy bases (the little square ones). I did this because, unlike the fronds, these stood up quite straight and tall and could be glued to a base without much hassle. Then, if you pushed the bases together, you'd get that natural look I was talking about.
Like the fronds, I painted the bases Goblin Green, then glued sand, then inked with Brown (also intending to later drybrush with Bleached Bone). Unlike the fronds, however, the little bales of grass kept falling off the bases. I used green stuff and re-attached probably every single one at least once before I was done.
What I like a lot about the grass and the fronds is that I didn't have to alter them at all; they were the perfect color and shade from the get-go. That was nice.
Trees
 Anyone who plays Warhammer 40,000 will recognize these trees. I have always thought them to be reminscent of Dr. Seuss, and every time I see them on the table I keep wanting to ask if the Marines are from the Star-Bellied Sneetch chapter.
A friend of mine assembled the trees for me, and I would like to wring his skinny neck for the rotten job he did. These are the most unbalanced, tippy trees I've ever seen in my life. For the most part, they could never actually survive in nature (even if there were a helpful Lorax to look after them). The bases of the trees came in two sizes: Unwieldy small, and unwieldy large, and each was equally prone to tipping. I glued the small ones to small clear flight bases and the large ones to large clear flight bases (do you get the impression that I have more than my share of extra clear flight bases?). Like the fronds and the grass, I painted the bases Goblin Green, glued sand, and then inked with Brown (intending to later drybrush with Bleached Bone)... but not before I primed the whole thing - base, tree and all - in black. The palmy-type leaves got a nice slathering of Goblin Green, followed by a wash of Dark Green Ink. Most of the trunks remain unpainted, but I believe I will drybrush them with either Bubonic Brown or Bleached Bone to create a brown-ish bunch of highlights that will give the trunk some texture. I think these trees look really good but, truth be told, I am just glad they're done.
The Tiered Hill
 This was my first failed attempt at a cliff. I do, in fact, know that several tiered steps that are not directly one over the other make for a very poor cliff, but I was just kind of experimenting. As you can imagine, I did the same with this that I did with the cliff (mentioned above): Cut the foam, glued it together, sealed it, added sand, sealed it some more, sealed it yet some more, sealed it one more time for luck, spray-painted it, added rocks and dry-brushed. I will probably do more with it, but what? I have no idea.
Ruins
 These ruins, like the Lorax trees mentioned above, are ubiquitous and well-known to players of WH40k. There isn't much magic in how I worked them: I based them in black, drybrushed them in bubonic brown, drybrushed some more with Bleached Bone and then drybrushed just a touch of white to give it the last bit of detail. They're really nice models, actually, and are full of interesting details, so it's no surprise that they take the drybrushing so well. I love how so little paint can really make them look alive; you can almost feel the stone.
Snake
 I stole this idea from the Games Workshop employees at Bayshore who recently finished a huge jungle-theme table, and added some little jungle critters about. I did the predictable thing: I rolled some greenstuff in my hands, made it all snakey, painted it orange, looked up "coral snake" on the internet, finished painting, shpritzed a bit of Purity Seal on it and then glued it to a ruined building. I then took a blurry photo.
The kids can't get enough of him, though. They call him "Snakey" and they make up stories about him and his life.
The Lone Ranger
 For some reason I absolutely cannot get a good photo of this little bugger.
As I've mentioned elsewhere on this blog, The Lone Ranger is an Inquisitor-scale Ranger that I had sitting on my shelf for a year or more and never assembled (I don't know a lot of people who play Inquisitor, so there wasn't much push to, while I have tons of 40k-scale stuff that needs attention). I finally decided to make him into a giant, noble statue for my new table... and I think he serves best that way. In short, it went like this: Primed him in Black, painted him Jade Green, drybrushed him in Brazen Brass, dullcoated him to reduce the shine, drybrushed just a touch of Shining Gold to bring it back (but in a smaller, more controlled way) and then mixed a bit of Scorched Brown with Brown Ink and ran a few drops down here and there to make it look like accumulated shmutz. The base itself is no big thing; two pieces of foam, painted black (by brush this time, not spray), drybrushed with Codex Grey, then with Fortress Grey, then a bit of White. I pinned the Ranger to the base with a long length of paper clip; it's not the toughest joint in the world, but it's better than just gluing him onto it and hoping for the best. He seems to be on there quite solidly now.
The Table Itself
 The table is, of course, what this is all about.
First, I glued the table with watered down white glue, covered it in sand, proceded to get sand into every nook and cranny of my home and every article of my clothing, let it dry, glued more, added more sand, then sprayed the Brown primer over it. You see, I bought two cans of Canadian Tire reddish-brown primer which I actually thought was just plain old brown (joke's on me; now we're doing Warhammer battles on Mars). After that, I drybrushed with Bleached Bone and lightly glued some flock on to create the illusion of patchy grass. My main mistake was dullcoating over the flock; I thought it'd keep the flock from falling off the table, but it went a little foggy and now I have some white patches on the surface. Oh well. I can't really care that much because I still think it looks dope.
The table itself is a game table I got from a buddy who sold it to me last summer. It's two pieces of wood that don't quite join right in the middle, hence that odd line you see through the center of the playing area.
If you have been following the progress of this table through the weekend, you'll notice that a few of the things I was working on are missing from the final series of pics; namely, the lumpy thing the Ranger was going to be mounted on, the Eldar Shrine-In-Progress and the bridge. Well, the lumpy thing was converted into a garden-variety unremarkable hunk of terrain because it seemed a bit too big for the statue. The Eldar Shrine is going to be completed, but I have decided to make it less sandy and stony than I had been doing, so it'll be back to the drawing board there. The bridge? I sorta let Dora over-ink it with green and brown so... we'll just make a new one. I will probably experiment later with stuff like spires, dragon's teeth stalagmites, bunkers, whatever. Now that I have foam and know how to use it, I'm getting pretty inspired... so I doubt you've seen the last of this kind of thing.
You now have an excellent idea of how I went about making this table. Here are a few tips just to round out the story and maybe help you a bit if you decide to try it yourself:
- You don't need expensive materials. I already had the table (just a piece of 4X4 flat wood) and the foam, but if you have to buy them you shouldn't have to fork over more than $15 for all you need as far as that goes. $5 for the spray paint (more like $12 if you get the latex can), maybe six bucks for some GW paint (which I already had), a buck for a brush from the dollar store and a couple bucks for a big bottle of white glue. Get sand from the playground (make sure you wash it) and use that. There are some people who make specialty tables which require a LOT of materials, and expensive ones at that. If you are one of those people you aren't going to be reading this, so obviously you aren't one of those people... which means you don't need all that pricey crap, especially if it's your first table.
- Don't dull coat the table itself unless you are 100% certain it won't go cloudy.
- You will need more paper towels than you currently have. No matter how many paper towels you've got, it's not enough. Get more.
- Make sure you're familiar with how to do decent drybrushing. You don't have to be a genius at it, but have a handle on the technique. The reason I say this is because drybrushing can really be screwed up and you don't want to have to start again with a four foot square table.
- No matter how careful you think you are, prepare for the appearance of the sand you will use in your project with paper on the floor and a good vaccuum cleaner. You will get sand into places where it doesn't belong, but you can minimize the hassle of it by not being stupid like I was.
- Forget about spray-painting the foam. I went with spray paint to keep the costs down (latex paint by the can is a lot more expensive), but in the end the amount of sealing I had to do on the foam to protect it just wasn't worth the hassle (and it still ate through a lot of foam anyhow). Just get some paint in a can and brush it on. You'll thank yourself.
- Think ahead about how you're going to do your color and stuff. For instance, I wanted the color to match the bases of my models, but I was way, way off. Why? Because I forgot that the first color I laid down on the bases of my models was Goblin Green, then sand, then Brown Ink, then drybrushed Bleached Bone, then some flock. The table got brown, sand, drybrushed with Bleached Bone, then flock. The difference? You can tell by looking at it.
- Clean as you go.
- Put chips and bits of chopped up foam into a paper bag, not a plastic one.
- Remember that as soon as glue hits the table or foam or whatever, it's already starting to dry. Work fast when glue is involved.
- Watch your clothes. I got paint on two, count 'em, two pairs of pants that I didn't really want paint on.
Last, but not least, here are more pics!


In case this is the first you've read of it, I decided to make my first gaming table recently. I made this decision on a day when I was at the St. Laurent mall taking my kids to a movie and, with a few minutes to kill, popped into Games Workshop to see what was up. My kids, Ruth and Dora, fell in love with the gaming tables that had been made by the staff. I had a conversation with Ruth, who is eight, about possibly making our own table, and she said that she'd like to. Ruth is a very clear thinker and, if she says she wants to embark on a project, she's probably capable of doing that. We talked about what kind of table we wanted, how we wanted to make it, when, etc. I told her that we could do it the coming weekend and, now that said weekend has just past, we have enjoyed the process of creating a gaming table... together. Dora also helped, but her work is a bit more... "rough" than Ruth's. What with being five years old and something of a party girl, Dora doesn't really care too much about doing it the right way as long as she's invited to the event.
I, myself, was also quite chuffed about the idea of making this table but, to be honest, if it wasn't for Ruth desperately wanting to see it come to pass I probably wouldn't have; very few people come out to the sleepy town where I live to play Warhammer with me (in fact, almost none) and I don't really need yet one more big, bulky thing in my kitchen to figure out what to do with. The kids, however, adore this thing and can't get enough of playing with it. They have a small collection of their own models (mostly leftovers and really cheap old models that they can paint in whatever ghastly way they please), and they just go nuts on this thing. So... I believe I will probably get the occasional game in and the kids will definitely have a great time so... where's the harm?
The process of creating it was a lot of fun, though. Even though I am still trying to get sand out of my hair and from my socks, I consider it to be an unqualified success. Here's a rundown of the ingredients of the Table™ and how they were made...
The Cliff
 Ruth said she wanted a cliff, and so who am I to tell her that I can't make one? This is four layers of foam cut with an exacto blade and glued together with white glue. As it is with the Tiered Hill (below), I worked like a mofo to seal this thing with glue because I wanted to spray paint it (and, as we all know, spray paint eats through foam like a fat kid through an M&M). Lots of watered-down glue went on, and fine sand went on top of it. I acquired the sand from my buddy Keith, who called it "Military Sand" (whatever that means). Anyhow, it's very fine and did great for my purposes. I had the kids collect good rocks from outdoors and bring them in, and I littered them all over this and the Tiered Hill to give them a slightly rougher, more natural look. After sealing the sand and rocks in with more glue (I did a lot of gluing), I sprayed it with the reddish-brown Mars Primer I got from Canadian Tire and minimal damage was done (and, to be honest, I didn't give much of a damn at that point). Following that, a nice drybrush with Bleached Bone. The edges of the cliff are, of course, black with a drybrush of Codex Grey. I will follow it up later with a drybrush of Fortress Grey and them maybe even white. The rocks were washed in Brown Ink just to differentiate them from the rest of the ground and, later, I will drybrush those as well to give them detail and to dull their shine.
The Crashed Aquila Lander
 As many of you will know by the sight of it, this is the crashed Aquila Lander from the Games Workshop Macragge box set. There is a lot of truly awesome, high-detail terrain in that box (it's a great buy), and this is my favorite piece (or broken pieces).
It was done by painting the ship parts Codex Grey (thinned paint) and the dirty parts Bubonic Brown. The grey was inked with watered-down black ink, the brown parts with watered-down brown ink. A bit of the internal engine workings were painted in Boltgun Metal. The orange parts were done with Blazing Orange watered WAY down. Decals were applied and the whole thing was dry-brushed in bleached bone.
The only thing I wish I'd done (and will never do) is paint the details of the belt and Auspex which are lying next to the crash (you can't see those in the pic here, but you can see them in the other pic further down in this entry). It would have been one of those "little touches". I also could have glued a bit of flock into different area to make it look as if it was being overgrown, and I might still.
Fronds
 Keith gave me a mat which was like a little plastic net covered in sprigs of these coriander-like plastic plants. He told me they were used for a display, and they even had gigantic pink flowers mixed in (don't get your hopes up; I didn't use those on the table). Basically, I could pluck one sprig off at a time and use it as I wanted to. The grass mat (mentioned below) was the same; a net of plastic grass sprigs, all in discrete bunches. This was quite a coup, and made the creation of the scenery that much more interesting.
I didn't want to just cut out a piece of plastic card and then glue a bunch of plants on, creating a static blob of area terrain. Instead, I glued the fronds to small flight bases so that they could be moved and clumped however seemed fitting. This was kind of a pain in the ass, however; due to the way the individual clumps of plants were, I had to pluck them off, leaf by leaf, and shove them into the hole of the flight base (which was partially filled with green stuff to keep the stems in there). These stupid stems flopped this way and that, and I nearly lost my mind doing this.
Afterwards, I painted the bases Goblin Green and then proceded to add a layer of glue and sand. Finally, they were washed in Brown Ink. I *will* get around to dry-brushing them with Bleached Bone to bring out the individual grains of sand, but... I'm a little Bleached Boned out right now.
What I like is that when the bases are all shoved together, the plants look quite natural in that you can't really tell where one ends and the other begins. You can also arrange them however you wish to create the shape of the area terrain as you wish.
Grass
 The story about the grass is almost exactly like the story about the fronds, right down to the benefactor (Keith). The difference is that I mounted these on Warhammer Fantasy bases (the little square ones). I did this because, unlike the fronds, these stood up quite straight and tall and could be glued to a base without much hassle. Then, if you pushed the bases together, you'd get that natural look I was talking about.
 Like the fronds, I painted the bases Goblin Green, then glued sand, then inked with Brown (also intending to later drybrush with Bleached Bone). Unlike the fronds, however, the little bales of grass kept falling off the bases. I used green stuff and re-attached probably every single one at least once before I was done.
What I like a lot about the grass and the fronds is that I didn't have to alter them at all; they were the perfect color and shade from the get-go. That was nice.
Trees
 Anyone who plays Warhammer 40,000 will recognize these trees. I have always thought them to be reminscent of Dr. Seuss, and every time I see them on the table I keep wanting to ask if the Marines are from the Star-Bellied Sneetch chapter.
 A friend of mine assembled the trees for me, and I would like to wring his skinny neck for the rotten job he did. These are the most unbalanced, tippy trees I've ever seen in my life. For the most part, they could never actually survive in nature (even if there were a helpful Lorax to look after them). The bases of the trees came in two sizes: Unwieldy small, and unwieldy large, and each was equally prone to tipping. I glued the small ones to small clear flight bases and the large ones to large clear flight bases (do you get the impression that I have more than my share of extra clear flight bases?). Like the fronds and the grass, I painted the bases Goblin Green, glued sand, and then inked with Brown (intending to later drybrush with Bleached Bone)... but not before I primed the whole thing - base, tree and all - in black. The palmy-type leaves got a nice slathering of Goblin Green, followed by a wash of Dark Green Ink. Most of the trunks remain unpainted, but I believe I will drybrush them with either Bubonic Brown or Bleached Bone to create a brown-ish bunch of highlights that will give the trunk some texture. I think these trees look really good but, truth be told, I am just glad they're done.
The Tiered Hill
 This was my first failed attempt at a cliff. I do, in fact, know that several tiered steps that are not directly one over the other make for a very poor cliff, but I was just kind of experimenting. As you can imagine, I did the same with this that I did with the cliff (mentioned above): Cut the foam, glued it together, sealed it, added sand, sealed it some more, sealed it yet some more, sealed it one more time for luck, spray-painted it, added rocks and dry-brushed. I will probably do more with it, but what? I have no idea.
Ruins
 These ruins, like the Lorax trees mentioned above, are ubiquitous and well-known to players of WH40k. There isn't much magic in how I worked them: I based them in black, drybrushed them in bubonic brown, drybrushed some more with Bleached Bone and then drybrushed just a touch of white to give it the last bit of detail. They're really nice models, actually, and are full of interesting details, so it's no surprise that they take the drybrushing so well. I love how so little paint can really make them look alive; you can almost feel the stone.
Snake
 I stole this idea from the Games Workshop employees at Bayshore who recently finished a huge jungle-theme table, and added some little jungle critters about. I did the predictable thing: I rolled some greenstuff in my hands, made it all snakey, painted it orange, looked up "coral snake" on the internet, finished painting, shpritzed a bit of Purity Seal on it and then glued it to a ruined building. I then took a blurry photo.
The kids can't get enough of him, though. They call him "Snakey" and they make up stories about him and his life.
The Lone Ranger
 For some reason I absolutely cannot get a good photo of this little bugger.
 As I've mentioned elsewhere on this blog, The Lone Ranger is an Inquisitor-scale Ranger that I had sitting on my shelf for a year or more and never assembled (I don't know a lot of people who play Inquisitor, so there wasn't much push to, while I have tons of 40k-scale stuff that needs attention). I finally decided to make him into a giant, noble statue for my new table... and I think he serves best that way. In short, it went like this: Primed him in Black, painted him Jade Green, drybrushed him in Brazen Brass, dullcoated him to reduce the shine, drybrushed just a touch of Shining Gold to bring it back (but in a smaller, more controlled way) and then mixed a bit of Scorched Brown with Brown Ink and ran a few drops down here and there to make it look like accumulated shmutz. The base itself is no big thing; two pieces of foam, painted black (by brush this time, not spray), drybrushed with Codex Grey, then with Fortress Grey, then a bit of White. I pinned the Ranger to the base with a long length of paper clip; it's not the toughest joint in the world, but it's better than just gluing him onto it and hoping for the best. He seems to be on there quite solidly now.
The Table Itself
 The table is, of course, what this is all about.
 First, I glued the table with watered down white glue, covered it in sand, proceded to get sand into every nook and cranny of my home and every article of my clothing, let it dry, glued more, added more sand, then sprayed the Brown primer over it. You see, I bought two cans of Canadian Tire reddish-brown primer which I actually thought was just plain old brown (joke's on me; now we're doing Warhammer battles on Mars). After that, I drybrushed with Bleached Bone and lightly glued some flock on to create the illusion of patchy grass. My main mistake was dullcoating over the flock; I thought it'd keep the flock from falling off the table, but it went a little foggy and now I have some white patches on the surface. Oh well. I can't really care that much because I still think it looks dope.
The table itself is a game table I got from a buddy who sold it to me last summer. It's two pieces of wood that don't quite join right in the middle, hence that odd line you see through the center of the playing area.
If you have been following the progress of this table through the weekend, you'll notice that a few of the things I was working on are missing from the final series of pics; namely, the lumpy thing the Ranger was going to be mounted on, the Eldar Shrine-In-Progress and the bridge. Well, the lumpy thing was converted into a garden-variety unremarkable hunk of terrain because it seemed a bit too big for the statue. The Eldar Shrine is going to be completed, but I have decided to make it less sandy and stony than I had been doing, so it'll be back to the drawing board there. The bridge? I sorta let Dora over-ink it with green and brown so... we'll just make a new one. I will probably experiment later with stuff like spires, dragon's teeth stalagmites, bunkers, whatever. Now that I have foam and know how to use it, I'm getting pretty inspired... so I doubt you've seen the last of this kind of thing.
You now have an excellent idea of how I went about making this table. Here are a few tips just to round out the story and maybe help you a bit if you decide to try it yourself:
- You don't need expensive materials. I already had the table (just a piece of 4X4 flat wood) and the foam, but if you have to buy them you shouldn't have to fork over more than $15 for all you need as far as that goes. $5 for the spray paint (more like $12 if you get the latex can), maybe six bucks for some GW paint (which I already had), a buck for a brush from the dollar store and a couple bucks for a big bottle of white glue. Get sand from the playground (make sure you wash it) and use that. There are some people who make specialty tables which require a LOT of materials, and expensive ones at that. If you are one of those people you aren't going to be reading this, so obviously you aren't one of those people... which means you don't need all that pricey crap, especially if it's your first table.
- Don't dull coat the table itself unless you are 100% certain it won't go cloudy.
- You will need more paper towels than you currently have. No matter how many paper towels you've got, it's not enough. Get more.
- Make sure you're familiar with how to do decent drybrushing. You don't have to be a genius at it, but have a handle on the technique. The reason I say this is because drybrushing can really be screwed up and you don't want to have to start again with a four foot square table.
- No matter how careful you think you are, prepare for the appearance of the sand you will use in your project with paper on the floor and a good vaccuum cleaner. You will get sand into places where it doesn't belong, but you can minimize the hassle of it by not being stupid like I was.
- Forget about spray-painting the foam. I went with spray paint to keep the costs down (latex paint by the can is a lot more expensive), but in the end the amount of sealing I had to do on the foam to protect it just wasn't worth the hassle (and it still ate through a lot of foam anyhow). Just get some paint in a can and brush it on. You'll thank yourself.
- Think ahead about how you're going to do your color and stuff. For instance, I wanted the color to match the bases of my models, but I was way, way off. Why? Because I forgot that the first color I laid down on the bases of my models was Goblin Green, then sand, then Brown Ink, then drybrushed Bleached Bone, then some flock. The table got brown, sand, drybrushed with Bleached Bone, then flock. The difference? You can tell by looking at it.
- Clean as you go.
- Put chips and bits of chopped up foam into a paper bag, not a plastic one.
- Remember that as soon as glue hits the table or foam or whatever, it's already starting to dry. Work fast when glue is involved.
- Watch your clothes. I got paint on two, count 'em, two pairs of pants that I didn't really want paint on.
Last, but not least, here are more pics!


8/14/2005
Buy This Awesome Thing Immediately
It's a Tool Organizer (I'll resist the urge to make this joke). This thing is roughly $29.00 at Canadian Tire and has pretty much solved all my bitz-related problems. It has two sides that fold down to offer divided trays in which you can put your stuff and five drawers to put the stuff that doesn't fit in the trays; 36 compartments in all. It's got a neat handle which makes carting it around a cinch and storing it even easier.
Ok, so here's what it's done for me: I have stored all the bitz I have laying around for my Eldar, Dark Eldar, Marines, Sisters of Battle and Tau all in one side (in other words, the other tray is still entirely empty). The drawers are home to my large flight bases, small flight bases, all stems for the flight bases, large (i.e. War Walker-size) bases, regular 25mm bases (slotted), regular 25mm bases (not slotted), Macragge doo-dads (I have a large collection of those pylons), and all the washers I use to magnetize my models (those of you who have seen my carrying case will understand).
In using this thing I have eliminated three Tupperware containers, two plastic bags, a dog-eared Dark Elf box and a bowl I was using for the washers. Where the thing itself is concerned, I still have one entire tray that's empty. In other words, I've put 100% of my bitz and overflowing model-related crap into one container (eliminating the need for using and storing seven other containers) and I still have tons of room for whateverdumb crap important treasures I may discover.
There are two downsides I can think of; one kinda-minor, two actually-minor. The first minor one is that both the trays have to be open if you want to slide the drawers out (minor irritant at worst). The second is that a few people (yes, Matt... I'm looking at you) have way more bitz than this thing can hold. This is a minor concern because this organizer makes for a decent way to sub-divide your bitz (like, you could buy two; one for all Fantasy and one for all 40k, or one for all Marines and one for all Nids... whatever). The slightly worse problem is that it's not really able to handle HUGE bitz. For instance, if you have a Land Raider hull you're holding onto, this wouldn't be a case that could likely carry it without taking a knife or dremel and modifying it (I don't know how big that thing would be; I'm just giving an example). If you need something to carry hella-big bitz in, this isn't your solution.
It's called a Tool Organzier and it's made by a company called "Zag" (and before you ask, no... me neither). I've included photos for you to peruse.
In sharing this information I feel as if I have done my good deed for the day. Mazeltov.


Ok, so here's what it's done for me: I have stored all the bitz I have laying around for my Eldar, Dark Eldar, Marines, Sisters of Battle and Tau all in one side (in other words, the other tray is still entirely empty). The drawers are home to my large flight bases, small flight bases, all stems for the flight bases, large (i.e. War Walker-size) bases, regular 25mm bases (slotted), regular 25mm bases (not slotted), Macragge doo-dads (I have a large collection of those pylons), and all the washers I use to magnetize my models (those of you who have seen my carrying case will understand).
In using this thing I have eliminated three Tupperware containers, two plastic bags, a dog-eared Dark Elf box and a bowl I was using for the washers. Where the thing itself is concerned, I still have one entire tray that's empty. In other words, I've put 100% of my bitz and overflowing model-related crap into one container (eliminating the need for using and storing seven other containers) and I still have tons of room for whatever
There are two downsides I can think of; one kinda-minor, two actually-minor. The first minor one is that both the trays have to be open if you want to slide the drawers out (minor irritant at worst). The second is that a few people (yes, Matt... I'm looking at you) have way more bitz than this thing can hold. This is a minor concern because this organizer makes for a decent way to sub-divide your bitz (like, you could buy two; one for all Fantasy and one for all 40k, or one for all Marines and one for all Nids... whatever). The slightly worse problem is that it's not really able to handle HUGE bitz. For instance, if you have a Land Raider hull you're holding onto, this wouldn't be a case that could likely carry it without taking a knife or dremel and modifying it (I don't know how big that thing would be; I'm just giving an example). If you need something to carry hella-big bitz in, this isn't your solution.
It's called a Tool Organzier and it's made by a company called "Zag" (and before you ask, no... me neither). I've included photos for you to peruse.
In sharing this information I feel as if I have done my good deed for the day. Mazeltov.


Subscribe to:
Posts (Atom)
